
Mastering the Basics: A Beginner’s Guide to Yoga Poses will help beginners start their yoga journey with confidence. It covers a wide range of beginner poses with detailed instructions and pictures to make it easy for beginners to follow.
Tree Pose is an energising standing balance that strengthens the arms and shoulders. It also improves balance, focus and concentration, and helps with posture.
Sitting Forward Fold
The seated forward fold, also called Paschimottanasana in Sanskrit, deeply stretches the back side of the body and calms the nervous system. It’s an important pose for beginners to learn because it helps prevent stiff muscles and lower-back pain, and it strengthens the hip joints and hamstrings.
Start this pose by sitting with your legs either together or hip distance apart. Then on your inhale lengthen the front of the torso and, on your exhale, see how far you can go without rounding the spine. Experiment with this over a series of 5 – 10 breaths.
Beginners often overstrain the hamstrings in this pose. To avoid this, try placing a block under your knees to create a lot of space in the pelvis. It will help you fold forward and reach your hands to your feet while avoiding any compression in the low back.
Using the block will allow you to deepen the forward fold gradually, and over time you may even get to the point where you can reach your feet. Just be sure not to make touching your toes the goal, it’s more important to keep a long spine and active legs. Then you can continue to come back up, leading with your heart.
Child’s Pose
Child’s Pose is a very relaxing posture, but it also stretches the back and hip muscles. It’s a common pose prescribed by physical therapists because it relieves tension in the lower back and hips.
To do this pose, kneel on the floor and sit your hips back onto your heels. Move your arms next to your legs, palms facing up. Then, lean forward and rest your forehead on the ground or on a folded blanket. It’s important to be aware of your breathing in this pose, and to practice deep and controlled breaths.
If you’re able, try reaching your arms out in front of you to open the shoulders and release any tension in them. This variation of the pose is called Extended Child’s Pose. You can also extend your front arm and rest it on the ground, a shin or a block.
If your back, knees or ankles hurt when you’re in this pose, don’t force the stretch by pushing through the pain. Instead, use the modifications suggested in the Modifications section of this article to keep your body safe and comfortable. You will learn over time to listen to your body and respect what it tells you it needs.
Warrior II
Warrior II (Virabhadrasana 2) challenges balance and strengthens the muscles of the upper legs, back, and arms. It also helps to relieve the common musculoskeletal problem known as runner’s knee. The psoas and pectineus muscles of the front hip are stretched while the quadriceps and tensor fascia lata muscles of the front leg are contracted. This combination of stretching and strengthening helps to improve the strength and endurance of your legs, making this pose an excellent introductory balancing posture.
Some yoga instructors may encourage you to bend your front knee so that it is parallel to the floor or even toward the center of the mat, but these are unnecessary nuances to this pose. It is more important to focus on externally rotating the front leg while keeping the standing heel grounded and the hips squared to the front of the mat.
As you come out of Warrior II, be sure to release the bent knee and bring your arms down. Then, stretch the top shoulder upwards and keep the spine long, avoiding a forward slump. Stay in this position for a few breaths. Attempt this pose again, gradually increasing the duration of the hold as you become more comfortable with it.
Side Angle Pose
This pose (Utthita Parsvakonasana in fancy yoga lingo) is all about extension—of the arms and legs. It strengthens the shoulders, chest and oblique muscles while improving balance and increasing energy levels. It also counters the effects of sitting too long or doing computer work, helping to reduce back pain and stiffness.
The difficulty level of this pose can vary greatly depending on a student’s flexibility and strength in the hips and knees. Beginners may need to shorten their stance and/or straighten the front leg until they can move into this position with ease and control. It’s important to note that women in late pregnancy should avoid this pose or at least take care not to bend the front knee deeply, which can put too much pressure on the abdomen and lower back.
It’s common for beginners to lose their stance and fall forward into Extended Side Angle Pose. To prevent this, be sure to keep the bent knee stacked directly over the ankle and the butt centered over the foot. If you’re having trouble keeping your balance, try resting your forearm on a block to help maintain the correct alignment. If you’re comfortable, you can add a twist to this pose by turning the head toward the hand in front of you.
Tree Pose
Vrksasana, or Tree Pose, is a beginner-level standing balance posture that strengthens the legs, knees and ankles while toning the buttocks. It is an antidote to the sedentary lifestyle of the modern world that leads to back problems and a weak core.
This simple posture also teaches you to listen and honor your body’s needs. Every day, your body may need the lifted foot positioned closer to the groin, or it might prefer to leave part of the foot on the ground for balance. Practicing this pose helps you learn to respect your body’s limits and encourages you to try new variations of the posture as you get stronger.
This balancing posture improves your sense of balance and helps you stay calm and focused in challenging situations outside of yoga class. The calming energy of the pose also gives you the ability to sway gently, like a tree in the wind, keeping your center stable regardless of the circumstances. Be careful not to practice this pose if you have low blood pressure or if you are dizzy. If you experience these symptoms, take a break and move into seated mountain pose or forward fold. You can also practice this pose with your hands in prayer position to make it easier if needed.
Bridge Pose
Bridge Pose, or Setu Bandha Sarvangasana, is a foundational pose that helps open the chest and lengthen the spine. It also builds core strength, which is helpful in preventing lower back pain. It is a preparatory posture for Urdhva Dhanurasana (Upward Bow Pose) and Salamba Sarvangasana (Supported Shoulderstand).
As the name suggests, Bridge Pose creates a connection between the body and mind. It also strengthens the thighs and ankles, stimulates the thyroid gland and improves digestion, and can relieve stress and mild depression.
To practice Bridge Pose, lie down on the mat with your knees bent and flat against the floor and feet a few inches apart. Place your arms alongside the body, palms facing down. Inhale to prepare, then exhale as you slowly lift your hips off the ground to move into the full pose. The movement of lifting and lowering your spine can be challenging for some people, especially for those with herniated discs or spinal injuries.
If you have a neck injury, avoid this pose completely and instead move into Constructive Rest or Supported Bridge Pose. For a more advanced version of the pose, try interlacing your hands together or gripping the edges of your mat to add challenge and focus to the posture.
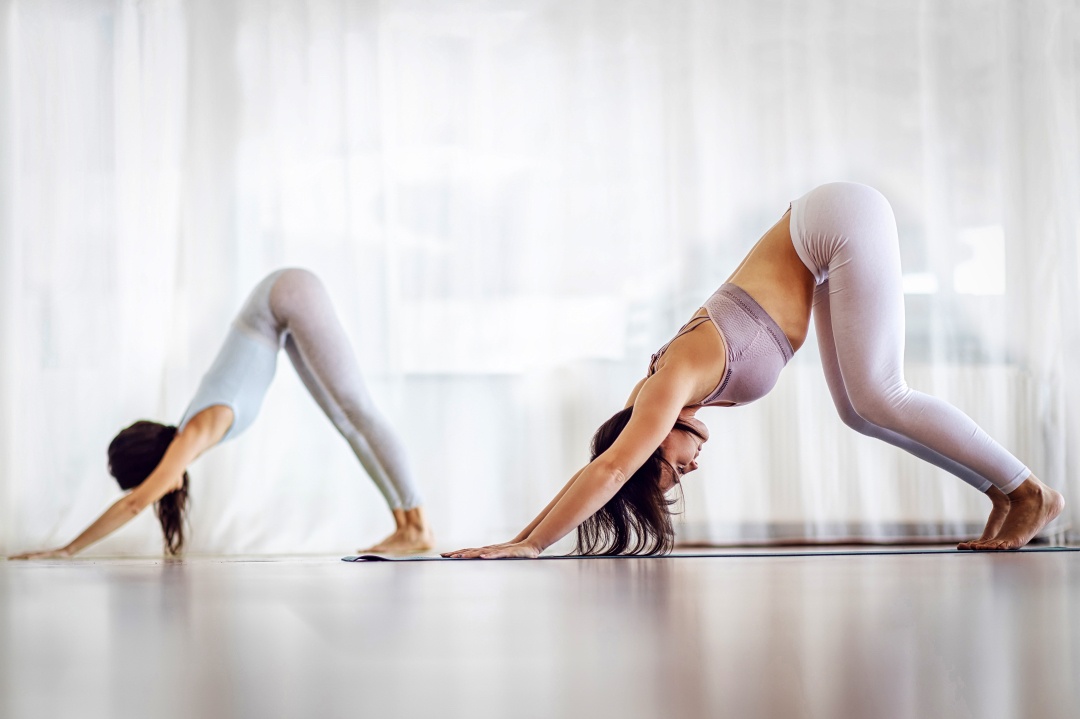
Downward Facing Dog
As the name suggests, this pose is a powerful stretch for the back and the shoulders. In addition, it builds strength in the wrists, arms, and core. But the posture can be difficult for beginners to master, particularly if they have wrist injuries or aren’t strong enough.
Common mistakes include putting too much weight into the hands, which can cause pain in the elbows and wrists. You can avoid this by spreading the weight evenly across the knuckles and fingertips. Another mistake is placing the feet and hands too close together, which can prevent the back from lengthening and creating space for the neck and shoulders. You can avoid this by walking the feet farther away from the hands or bending the knees.
If you have a shoulder or wrist injury, try practicing dolphin pose instead. This variation on downward facing dog uses the same muscles but puts less pressure on the wrists. To make the transition to dolphin easier, start by practicing cobra pose a few times as a warm-up before moving on to this pose.